Organising a Parents' Evening
In this section we will run through the recommended way to use ParentEve to organise a successful parents' evening. In overview, the steps are (in order):
- Start working on an event (Start Working on an Event)
- Import teachers (Import Teachers)
- Import parents and pupils (Import Parents)
- Send request letters to parents (Send Request Letters to Parents)
- Enter information in replies (Enter Information in Replies)
- Optimise the schedule (Optimise Schedules)
- Print the schedule (Print Schedule)
Start Working on an Event
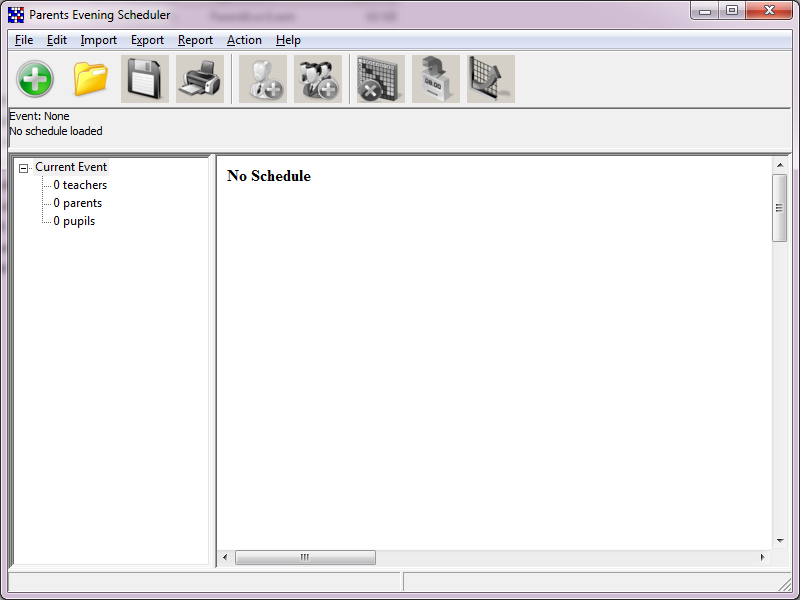
When the program starts up, no event is defined and the main window
will appear in its default state as shown in the picture below:
 In order to start working on an event you have two options:
- Create a new event by selecting the File / New Event menu option or clicking on the green "plus sign" toolbar button
- Load an existing event by selecting the File / Load Event menu option or clicking on the yellow "folder" toolbar button
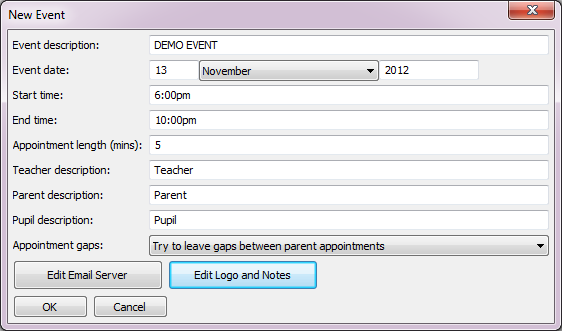 You can enter the following pieces of information in this window:
- Event description: this is the name of your event - something like "Year 10 Parents' Evening" is usual for this field. It gets printed out on the title area of all ParentEve's printed handouts, so make sure it is something that is descriptive.
- Event date: the date that your event takes place. Again this gets printed on the handouts so it is important to get this correct otherwise parents may not come on the correct day.
- Start time and End time: these two fields define when your event starts and ends. They default to 6:00pm and 10:00pm respectively, but you can change them to the correct values if necessary. When inputting a time you must put it in in 12-hour format, with a colon separating the numbers and with "am" or "pm" directly afterwards. For example, "6:00pm" is a valid entry.
- Appointment length: this defaults to five minutes but you can enter as short or as long a time as you like. All appointments will be made the length you specify and parents will receive this length of gap between each appointment. You can specify half-minutes here, for example enter "7.5" to get two appointments every 15 minutes (i.e. 8 appointments per hour). Times are displayed to the nearest minute but tracked to the second.
- Teacher description: You can change the way ParentEve displays the word "teacher" on emails and printouts using this box. For example, your school may use "Tutor" instead, and changing it here will cause the word "Tutor" to appear on printouts.
- Parent description: As above, allows you to change the way the word "Parent" is printed or emailed. For example, some schools use "Guardian" or simply "Attendee".
- Pupil description: As above, allows you to change the way the word "Pupil" is printed or emailed. For example, some schools use "Student" instead.
- Appointment Gaps: This controls whether ParentEve will try to leave gaps between parent appointments.
- Always leave gaps: Forces a gap in all circumstances.
- Don't insert gaps: Turns off gaps completely.
- Insert gaps when parent changes location: This looks at the teachers location for each appointment the parent has. If the location field changes, the software will leave a gap.
Import Teachers
You can import lists of teachers, parents and pupils directly; this saves lots of time as it is quicker than typing in all the data manually. It also ensures that the data is correct, reducing the possibility of typing errors. If you use SIMS by Capita as your management system, ParentEve can import data directly from SIMS (see Import from SIMS for further details). In this example we will assume instead that you're using a CSV file import, as this works with any management system. Firstly, you need to export the list of teachers from your MIS system. Both text (one teacher per line) and CSV formats are supported by ParentEve for teacher imports. Once you have the data file, you need to import it into ParentEve. Either press the button on the toolbar (shown in The Toolbar ), or go to the "Import" menu and select "Import Teachers". The following window will appear: The "Import Source" area has buttons to indicate where you want to pull data
in from. The choices are "File" to import from a file on disk and
"SIMS" to import directly from a SIMS MIS. Choose "File" here.
The "Filename" box stores the name of the file to be imported.
Simply press the "Browse" button next to it and select the file
that you wish to import.
The "File Type" box allows you to tell ParentEve what sort of
file you are importing. A suitable default choice will be selected for you
but if this is wrong you can change it by pressing the small arrow on the
right hand side of the box and then selecting the correct type.
After selecting the file and its type, press the button marked
"Perform Import". This will read the file's contents into the preview window
below the button. A text file will import immediately but a CSV file
will open a new window so you can define what the columns mean:
The "Import Source" area has buttons to indicate where you want to pull data
in from. The choices are "File" to import from a file on disk and
"SIMS" to import directly from a SIMS MIS. Choose "File" here.
The "Filename" box stores the name of the file to be imported.
Simply press the "Browse" button next to it and select the file
that you wish to import.
The "File Type" box allows you to tell ParentEve what sort of
file you are importing. A suitable default choice will be selected for you
but if this is wrong you can change it by pressing the small arrow on the
right hand side of the box and then selecting the correct type.
After selecting the file and its type, press the button marked
"Perform Import". This will read the file's contents into the preview window
below the button. A text file will import immediately but a CSV file
will open a new window so you can define what the columns mean:
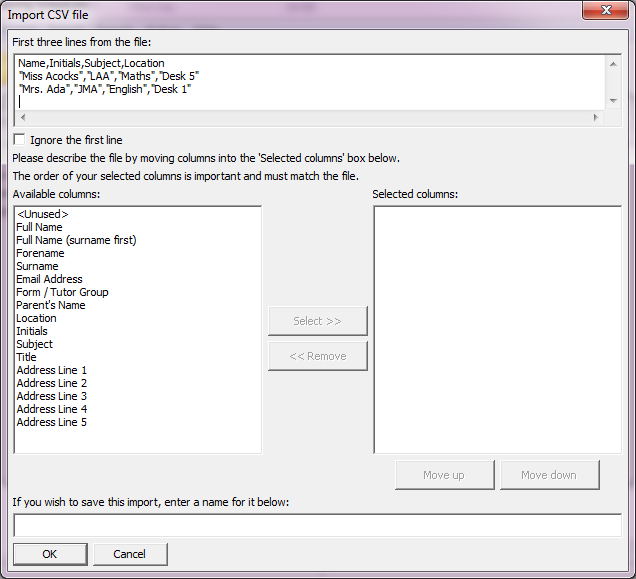 The first three lines of the data file are shown at the to so that you
can see what is in the file. You should now transfer columns from the
"available" list on the left to the "selected" list on the right.
For the example above, the final configuration should look like this:
The first three lines of the data file are shown at the to so that you
can see what is in the file. You should now transfer columns from the
"available" list on the left to the "selected" list on the right.
For the example above, the final configuration should look like this:
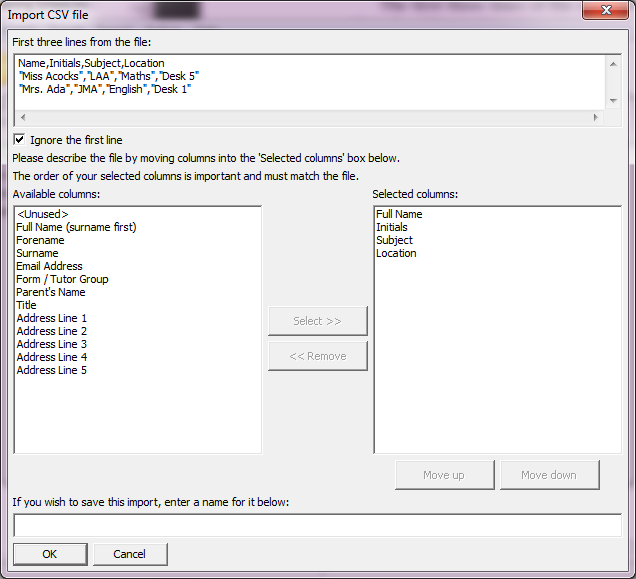 The columns selected are "Full Name", "Initials" and "Subject"
which matches the data in the top area. It is important to get the
order of the columns right or the import will not be correct.
Once you are happy with the column order, click the "OK" button and
the import window will change to look like like this:
The columns selected are "Full Name", "Initials" and "Subject"
which matches the data in the top area. It is important to get the
order of the columns right or the import will not be correct.
Once you are happy with the column order, click the "OK" button and
the import window will change to look like like this:
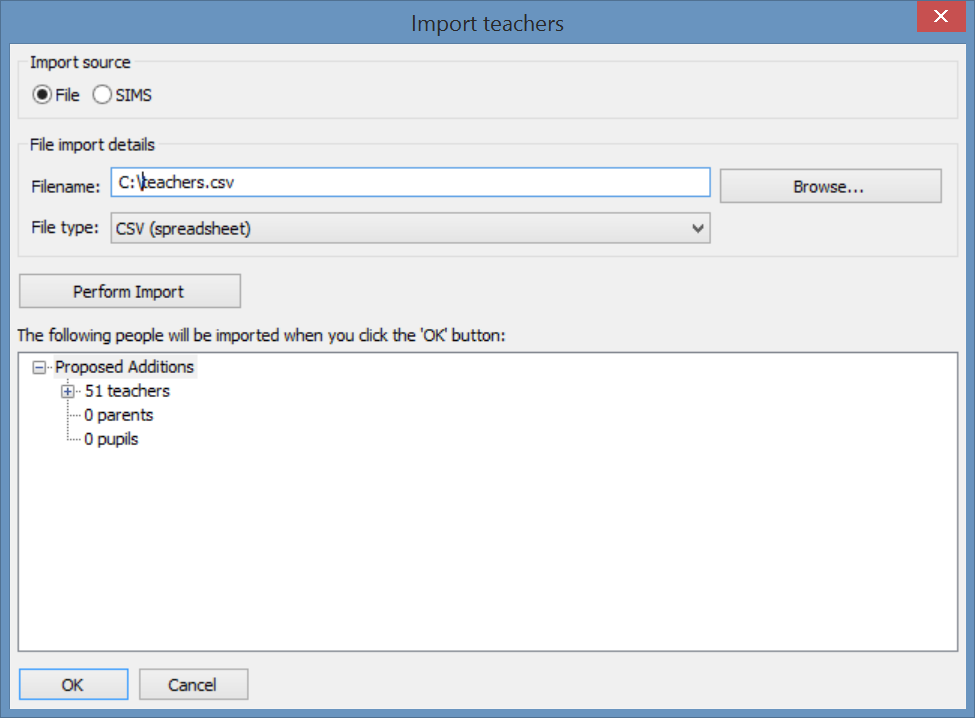 The preview window shows that three teachers, no parents and no pupils
were found in the file. At this point, the import has not actually
happened and you can cancel out
of this window without affecting your event. However, if this import looks
correct then simply press the "OK" button and the new teachers, parents
or pupils will be merged into your event.
The preview window shows that three teachers, no parents and no pupils
were found in the file. At this point, the import has not actually
happened and you can cancel out
of this window without affecting your event. However, if this import looks
correct then simply press the "OK" button and the new teachers, parents
or pupils will be merged into your event.
Import Parents and Pupils
Importing parents and pupils is done in the same way as for teachers.
Either press the button on the toolbar (shown in The Toolbar )
or go to the
"Import" menu and select "Import Parents".
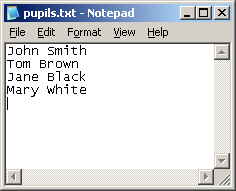
Both teachers and pupils can be imported from text files where one person
is stored per line. These sort of files can be typed manually or exported from
a suitable system - an example is shown below being typed in Notepad:
 However, the pupil import also supports "XML" format files. This format
is a UK government standard that all major school computer systems use for
exchanging information. If you have a system such as Capita's SIMS
you can export lists of your pupils in this format and ParentEve will be able to
read them in.
One important thing to note is that if the file is a text file, it should
contain pupils only - parents will be automatically created for each of
the pupils found in the file. Also note that this will happen too for
CSV files if no parent name is given.
In the preview window the parents and pupils will be shown in alphabetical
order, not the order they occured in the file.
However, the pupil import also supports "XML" format files. This format
is a UK government standard that all major school computer systems use for
exchanging information. If you have a system such as Capita's SIMS
you can export lists of your pupils in this format and ParentEve will be able to
read them in.
One important thing to note is that if the file is a text file, it should
contain pupils only - parents will be automatically created for each of
the pupils found in the file. Also note that this will happen too for
CSV files if no parent name is given.
In the preview window the parents and pupils will be shown in alphabetical
order, not the order they occured in the file.
Correct for Twins
Once the parents and pupils have been entered, it is vitally important that you check that the right number of parents have been created and that the pupils have been assigned correctly. The most common error at this point is that there are not enough parents and ParentEve has misidentified twins. This is caused by the presence of duplicates in the "Parent Name" field - for example if there are two unrelated pupils with a common surname like "Smith" and with their parents both defined as "Mr. & Mrs. Smith". In this example ParentEve would see the identical parent names and assume that the two children were twins - there would be only one set of parents defined (instead of two) and this set of parents would be marked as having twins. If this happens, the best fix is to re-export the data from your MIS system but with more detail, so that ParentEve can tell them apart. The primary way of doing this is to populate the "Parent Identifier" field, which is a field that is guaranteed to be unique for each parent. Most MIS systems will have some form of ID number that can be used for this; once this is included in the export, ParentEve can easily distinguish between parents with identical names. If your MIS system does not have a unique identifier number for each parent, you can either add more detail in the "Parent Name" field (for example, "Mr.A. and Mrs.B. Smith"), or include the parent's postal address. ParentEve realises that two "Mr. and Mrs. Smith" entries with different addresses are two different parents, and will use the first line of the postal address as the unique identifier in this case. Once you clear and reimport the data this should remove the duplicated parents. If you wish to fix it manually instead, simply define a new parent manually for the parents that are missing (see Parents), delete the incorrect pupil from the first parent and then add the deleted pupil back in to the new parent (see Pupils).
Send Request Letters to Parents
At this point you need to know which parents wish to see which teachers about which pupils. The vast majority of schools choose to send a request letter to parents to ask them this, although your school may be different in this regard. You will need to get the following information from the parents:
- Which teachers do they wish to see
- Whether they will arrive late or leave early
Enter Information in Replies
Normally the replies to the letters will be received back within a few days. As they come back in you must enter the information that is supplied. As there is normally a lot of information to be entered, this step is best performed by multiple people. Please see Merging Changes for further information on multi-user operation in ParentEve and Example Usage for an example of how to do it.
Edit Appointments
The easiest way to edit the appointments requested by a parent is
to find the pupil in question in the tree on the left-hand side of
the main window - it has to be through the pupil because of
the case of twins, where ParentEve needs to know which pupil
is involved in the request. Right-click on the pupil and select
"Edit Appointments" - a window like this will appear:
 The window shows all the teachers - the pupil's current appointments
will be ticked and you can simply click on the appropriate teachers to
make or unbook appointments.
If this window is too large to fit on your screen (i.e. you have an
exceptionally large number of teachers) it is possible to reduce
the size of it by importing the list of which teachers teach which
pupils, thus allowing ParentEve to only show the relevant teachers
on this window.
The "Select All" button will tick all boxes, making an appointment
request for all teachers. Conversely, the "Clear All" button
unticks all the noxes, removing any existing requests.
You can also move between different pupils and forms easily using
the arrow buttons beside the name and form respectively. This feature
allows you to enter many pupils' appointments very quickly.
The window shows all the teachers - the pupil's current appointments
will be ticked and you can simply click on the appropriate teachers to
make or unbook appointments.
If this window is too large to fit on your screen (i.e. you have an
exceptionally large number of teachers) it is possible to reduce
the size of it by importing the list of which teachers teach which
pupils, thus allowing ParentEve to only show the relevant teachers
on this window.
The "Select All" button will tick all boxes, making an appointment
request for all teachers. Conversely, the "Clear All" button
unticks all the noxes, removing any existing requests.
You can also move between different pupils and forms easily using
the arrow buttons beside the name and form respectively. This feature
allows you to enter many pupils' appointments very quickly.
Start and End Times
Only some parents will need their start and end times changed, so this step is optional. For those parents that do need different times, click on the appropriate tick box and then select the time from the drop-down menu next to it. You can define a late start and an early departure if necessary.
Optimise Schedule
Once all of the replies have been received you will need to
produce an optimised schedule so that people are not waiting around
for too long. The "Optimise" option will
start improving the schedule you currently have from the state
it is currently in; you can stop and start optimisation as many times
as you like and it will not break anything.
When you click the "Optimise" button in the toolbar, the
following window will appear and will instantly
start optimising your schedule:
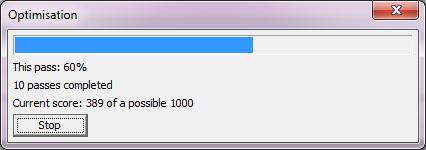 It is guaranteed that the schedule cannot get a worse score
if you pick this option. The optimisation process will continue until the
score reaches 1,000 (a perfect score), but it may
be safely stopped at any point by pressing the "Stop" button.
You do not have to wait until the score reaches 1,000 - indeed, it may
not be possible for the program to find a perfect solution. This doesn't
matter, as you can still run a quite acceptable parents evening with a high
but not perfect score.
As the optimiser runs, the overview area will constantly update
to show the optimiser's progress. You can watch the squares turn from red
to blue as the appointments get reshuffled in a more and more efficient
way.
It is guaranteed that the schedule cannot get a worse score
if you pick this option. The optimisation process will continue until the
score reaches 1,000 (a perfect score), but it may
be safely stopped at any point by pressing the "Stop" button.
You do not have to wait until the score reaches 1,000 - indeed, it may
not be possible for the program to find a perfect solution. This doesn't
matter, as you can still run a quite acceptable parents evening with a high
but not perfect score.
As the optimiser runs, the overview area will constantly update
to show the optimiser's progress. You can watch the squares turn from red
to blue as the appointments get reshuffled in a more and more efficient
way.
Print Schedule
In order to print, click on the small printer in the toolbar
(shown in The Toolbar). You
will see a "Print Settings" window open, which will look
like this:
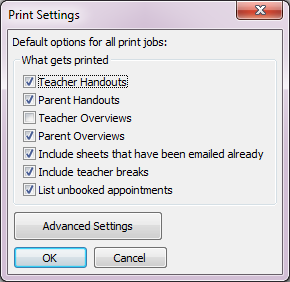 The window will allow you to see all the handouts which will be
printed. There are four types of handouts, which appear in the
following order:
The window will allow you to see all the handouts which will be
printed. There are four types of handouts, which appear in the
following order:
- Teacher handouts: one per page, these are to give to the teachers so that they know who they are seeing
- Parent handouts: two per page, these are to give to the parents so that they know which teachers they need to see
- Teacher overviews: 4 per page, these are small copies of the teacher handouts which are useful for staff who forget to bring their schedule handouts
- Parent overviews: These are small copies of the parent handouts (16 per page) which enable helpers (e.g. prefects) to guide parents during the evening
The extra options that appear on this window are, in order:
- Include sheets that have been emailed already: If ticked, this will print out sheets for people who have already received their schedule via email. Untick this if you're happy for parents who have received emails to not get printed handouts.
- Include teacher breaks: If this box is ticked, teachers will see breaks marked explictly on their handouts and emails. If not ticked, breaks will simply be omitted.
- List unbooked appointments: Specifies whether to include a section at the bottom of a handout that lists unbooked appointment requests for this person.
Advanced Print Settings
The "Advanced Print Settings" window allows you to specify exactly how
your printouts will appear. It looks like this:
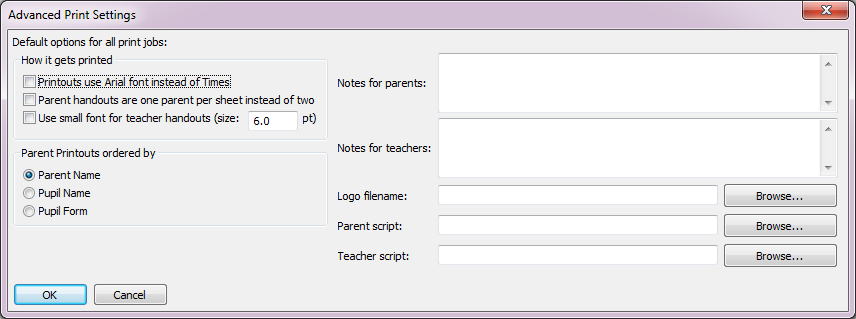 The window contains the following fields:
- Notes for parents: Parent notes are small pieces of text that are printed at the bottom of each parent handout. You can enter as much text as you like here, but be aware that if you enter too much text it may be lost off the bottom of the printout.
- Notes for teachers: Teacher notes are similar to the parent notes described above, but they go on the teachers' printouts instead.
- Logo filename: This is the name of a file with the school's logo in it. You do not have to specify it, but if you do the logo will be included on the top of all printouts. It can be in any common image format.
- Parent script: Specifies the filename of a script that alters the printouts for parents. This can be used to provide custom printouts for parents if ParentEve's default format is not suitable. This feature only available in ParentEve Pro.
- Teacher script: Specifies the filename of a script that alters the printouts for teachers. This can be used to provide custom printouts for teachers if ParentEve's default format is not suitable. This feature only available in ParentEve Pro.
QR Codes
If you have ParentEve Pro, all printouts will include a "QR code" which is
a small square image with encoded information in it. If a parent or teacher
scans this code with their phones, a
calendar attachment will pop up and they can add
the parents evening to their personal schedule with a single tap.
Apps for scanning QR codes are widely available for Android
and Apple devices.
Consequently, any parents who can't receive an email from your school can simply
scan the letter that they receive instead.
An expanded example of one of ParentEve's QR codes is shown below; on the actual
printouts the code is a small square in the corner. Try scanning it with
your own device to see what happens:

Locking the Schedule
After you request a printout the software will ask you if you wish to lock the schedule. If a schedule is locked then no existing appointments can be changed - it is possible to add latecomers in but they will be assigned to free slots wherever possible. The advantage of locking the schedule is that it ensures your parent printouts will not become invalid. You can safely send the printouts to parents once you have locked the schedule - if anybody requests appointments after this point then the existing printouts do not have to be changed.