Advanced Features
Defining Teachers Manually
Normally teachers are imported from a file; however, it is sometimes
necessary to add a teacher manually.
To add a teacher, select the "Add Teacher" menu option from the
"Edit" menu. The following window will appear:
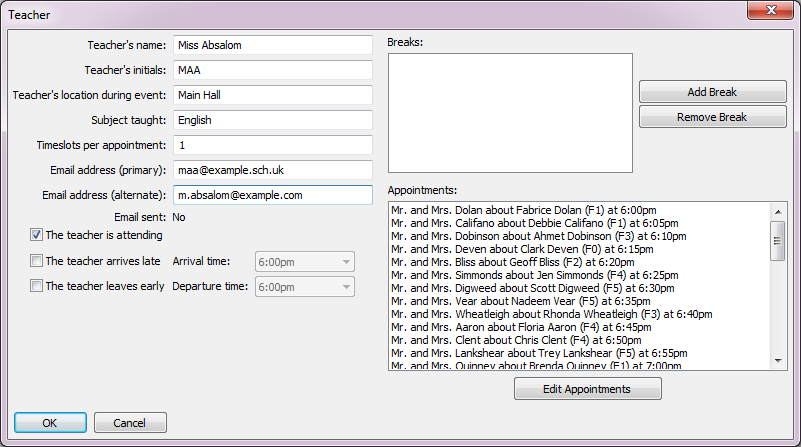
Names and Initials
Teachers are defined by their "display name" and optionally by their initials. The teacher's "display name" must be defined - this is the name that will be printed on the parents' schedules, and it must be unique (i.e. no two teachers may share the same display name). Optionally you may also define initials for each teacher. These merely give an alternate name or string of initials that this teacher may be known by. This is used to ease the inputting of the teachers that the pupils want to see. Again, each "initials" value must be unique, i.e. no two teachers may share the same initials. If an initials section is not supplied, the teacher must always be referred to by their display name.
Time Constraints
Two other optional sections may also be supplied - the "before" and "after" sections. These both supply time constraints for the teacher in question, and their use tells the program when the teacher can accept appointments. Therefore, if a teacher cannot get in until 7pm, you should specify "after 7:00pm" or "after 19:00" for that teacher. It is possible to specify both a before and an after constraint for a teacher.
Locations
Teachers can optionally have locations defined for them - a location is simply the name of the place where the teacher will be for the event, for example a room name or a desk number. If you choose to define locations for your teachers the location names will be included on all printouts, allowing teachers to know where they are meant to be and allowing parents to find them easily. Typical examples of locations include things like "Room M1, Maths Block" or "Desk 12". You can be as descriptive as you like as long as you do not run out of room on your printouts.
Subjects
You can optionally specify the subjects taught by your teachers. If you do specify subjects they will be available when making appointment requests. Each appointment request includes a subject field and pupils may book multiple requests for the same teacher with different subjects. The subjects can be empty in which case it is presumed to be obvious what will be discussed. In this case mutiple appointments can't be booked with the same teacher and pupil. Simply book one longer appointment if this is needed.
Breaks
You may also define breaks at specific times for individual teachers. A break takes up a single timeslot, so if you wish to define a long break you have to specify each timeslot in the break. For example, to define a 10-minute break at 8pm you must put in two breaks as "8:00pm" and "8:05pm".
Appointment Length
ParentEve allows teachers to request a default appointment length. For example, most teachers may be happy with a 5-minute appointment, but a form tutor may request 10-minute appointments instead. The "Timeslots per appointment" value chooses the default appointment length for all appointments made with this teacher. In our example above, the teacher who wants the 10-minute default would enter "2" in this box to indicate that they would like two 5-minute slots per appointment. Please note that appointment lengths can be overridden on a per-appointment basis as well; please see Pupils for further information.
Defining Parents and Pupils Manually
As with teachers, it is normal to import parents and pupils from a file. Sometimes it is necessary to add parents and pupils manually; in this case, the parent must always be entered first and then the pupils should be added to the parent.
Parents
To add a parent manually, select the "Add Parent" menu option from the
"Edit" menu. The following window will appear:
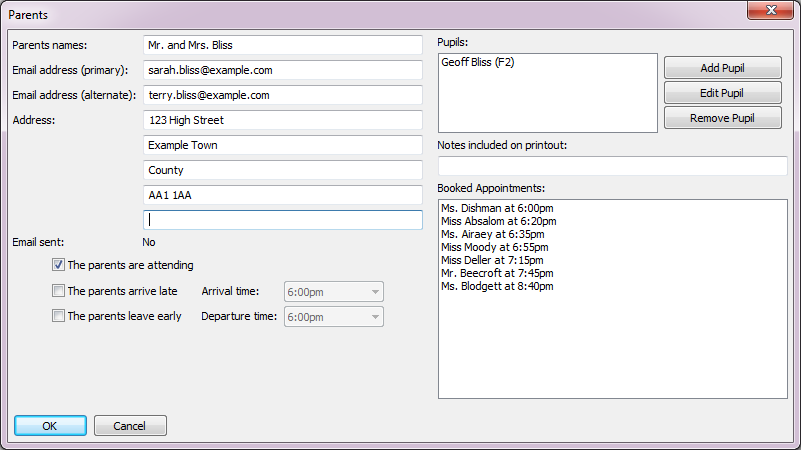 A set of parents is defined by their "display name" in the same way as
for Teachers. Time constraints can be defined in exactly the same way as for
teachers too, so late arriving or early departing parents can be catered
for.
You can also optionally define email addresses for parents. If you
define one then you can send the parent's schedule to them automatically
via email instead of having to print it out, saving postage and admin
costs (see Defining Email Addresses).
A set of parents is defined by their "display name" in the same way as
for Teachers. Time constraints can be defined in exactly the same way as for
teachers too, so late arriving or early departing parents can be catered
for.
You can also optionally define email addresses for parents. If you
define one then you can send the parent's schedule to them automatically
via email instead of having to print it out, saving postage and admin
costs (see Defining Email Addresses).
Pupils
You then need to define the pupils for each set of parents.
In the vast majority of cases, each set of parents only has one pupil, but
the program fully supports multiple pupils per parent (i.e. twins, triplets,
non-twin siblings in the same school year and so on). To add a pupil,
press the "Add Pupil" button on the right-hand side of the parent
window. The following window will appear:
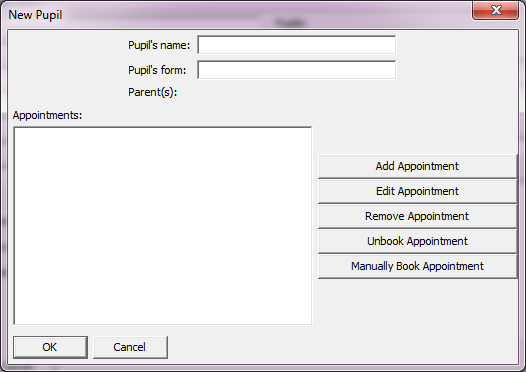 Pupils are defined by name, and you can optionally specify the form
(i.e. house or tutor group) they are in. If you define a form for a pupil,
the program will print the form on all handouts and will also group the
pupils into forms on the left side of the main display, making it easier to
find pupils.
For each pupil, a list of requested teachers needs to be given. These specify
the teachers that the parents wish to see for each pupil. In order to add a
request to see a teacher, press the "Add Appointment" button. The
following window will appear:
Pupils are defined by name, and you can optionally specify the form
(i.e. house or tutor group) they are in. If you define a form for a pupil,
the program will print the form on all handouts and will also group the
pupils into forms on the left side of the main display, making it easier to
find pupils.
For each pupil, a list of requested teachers needs to be given. These specify
the teachers that the parents wish to see for each pupil. In order to add a
request to see a teacher, press the "Add Appointment" button. The
following window will appear:
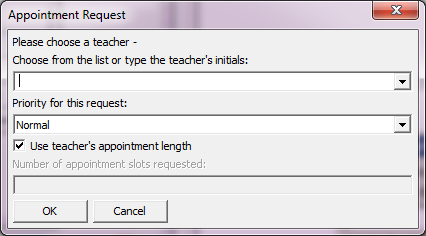 The teachers can be
chosen quickest by typing their initials into the box, but this will only
work if you have defined initials for each teacher. You can also choose
teachers from a list by pressing the small arrow on the right and selecting the
required teacher.
A priority can also be set against each request to see a teacher. The
available priorities are:
The teachers can be
chosen quickest by typing their initials into the box, but this will only
work if you have defined initials for each teacher. You can also choose
teachers from a list by pressing the small arrow on the right and selecting the
required teacher.
A priority can also be set against each request to see a teacher. The
available priorities are:
- High: high priority requests are all booked in first before any others
- Normal: the default priority for appointments
- Low: low priority appointments are booked in last, after the rest of the parents' evening has been set up.
Booking In
As you find out which teachers need to be seen and fill in the appointments, you will notice that the program will put the phrase "Not booked yet" against the appointment in the pupil window. This is because the program has not yet worked out an appointment time. In order to place the new requests into the current schedule, click the "Book Unbooked" button in the toolbar. This ensures that all outstanding requests have times booked for them. The program will warn you if you try to print with unbooked requests - this is allowed (if you have an overbooked evening) but if you need all appointments booked then click this button.
Restarting Optimisation
It is occasionally desirable to restart the optimisation process, because sometimes the optimisation gets "stuck" at a score like 960 or 970, and cannot get up to good scores like 985. This is more likely to happen when you have added some new information from late parent slips. If this happens, the "Rebook" button is needed. Selecting this option will clear out all of the current appointments, and will rebook them all in using a "first-come-first-served" method. The resulting schedule will score very low, but it allows you to start the optimisation again from scratch. The overview area will show a large block of blue squares against the left-hand edge (resulting from the first-come-first-served booking), and there will be many red squares as the appointments tail off towards the end of the evening. However, the situation will rapidly improve with a short run of the optimiser and a good score is more likely.
Reusing the Teacher List
A common situation is where you have entered all of the school's teachers in one event, and you wish to reuse this list for another event - for example, when setting up new events for the youngest year in the school. In order to do this, select the "Delete Parents and Pupils" option from the "Edit" menu. This will remove all of the parents, pupils and requested appointments, leaving just the teachers. This schedule can then be saved to a different filename using the "Save As" option from the "File" menu.
Reusing Last Year's File
Another common situation is where you held a parents evening last year, the pupils in question have now moved up a year and you wish to reuse the old file as a basis for the new parents evening. This is done by selecting the "Delete Appointments" option from the "Edit" menu. This removes all requests for parents to see teachers, and all the overview squares will turn white. As the parents send in the information about who they wish to see, you can book the appointments in as usual.
Divorced Parents
Sometimes pupils have divorced parents who must not meet each other at your parents' evening. The way to implement this is to add each parent separately (i.e. one parent for "Mr. Smith" and one for "Mrs. Smith"). Mark one parent as leaving early, and the other parent as arriving late. Make sure there is a big enough gap between them, depending on the exact situation. Once this is done, enter the pupil twice (once for each parent), and enter the appointment requests on each copy of the pupil.